A deep dive into Stable Diffusion and its inpainting variant for interior design
This article was authored by Rafael Guedes
Introduction
In this fast-paced world that we live in and after the pandemic, many of us realised that having a pleasant environment like home to escape from reality is priceless and a goal to be pursued.
Whether you are looking for a Scandinavian, minimalist, or a glamorous style to decorate your home, it is not easy to imagine how every single object will fit in a space full of different pieces and colours. For that reason, we usually seek for professional help to create those amazing 3D images that help us understand how our future home will look like.
However, these 3D images are expensive, and if our initial idea does not look as good as we thought, getting new images will take time and more money, things that are scarce nowadays.
In this article, I explore the Stable Diffusion model starting with a brief explanation of what it is, how it is trained and what is needed to adapt it for inpainting. Finally, I finish the article with its application on a 3D image from my future home where I change the kitchen island and cabinets to a different colour and material.
As always, the code is available on Github.
Stable Diffusion
What is it?
Stable Diffusion [1] is a generative AI model released in 2022 by CompVis Group that produces photorealistic images from text and image prompts. It was primarily designed to generate images influenced by text descriptions but it can be used for other tasks such as inpainting or video creation.
Its success comes from the Perceptual Image Compression step that converts a high dimensional image into a smaller latent space. This compression enables the use of the model in low-resourced machines making it accessible to everyone, something that was not possible with the previous state-of-the-art models.

How does it learn?
Stable Diffusion is a Latent Diffusion Model (LDM) with three main components (variational autoencoder (VAE) [2], U-Net [3] and an optional text encoder) that learns how to denoise images conditioned by a prompt (text or other image) in order to create a new image.
The training process of Stable Diffusion has 5 main steps:
1. The Perceptual Image Compression step consists in an Encoder that receives an image with a dimension of 512x512x3 and encodes it into a smaller latent space Z with a dimension of 64x64x4. To better preserve the details of an image (for example, the eyes in human face), the latent space Z is regularized using a low-weighted Kullback-Leibler-term to make it zero centered and to obtain a small variance.

2. The Diffusion Process is responsible to progressively add Gaussian noise to the latent space Z, until all that remains is random noise, generating a new latent space Zt. t is the number of times the diffusion process occurred to achieve a full noisy latent space.
This step is important because Stable Diffusion has to learn how to go from noise to the original image as we will see in the next steps.

3. The Denoising Process trains a U-Net architecture to estimate the amount of noise in the latent space Zt in order to subtract it and restore Z. This process is able to recover the original latent space Z by gradually denoise Zt, basically, the inverse of the Diffusion Process.

4. During the Denoising Process a prompt, usually text and/or other image, can be concatenated to the latent space Zt. This concatenation will condition the Denoising Process which allows the creation of new images. The authors added cross-attention mechanisms in the backbone of U-Net to handle these prompts since they are effective for learning attention-based models of various inputs types.
When it comes to text, the model uses a trained text encoder CLIP [4] that encodes the prompt into a 768-dimensional vector which is then concatenated to Zt and received by U-Net as input.
As we can see in Figure 6, we concatenated to Zt the text prompt “remove the lamp”, which conditioned the Diffusion Process restoring a Zt without the lamp near the chair that the original Zt had.

5. Finally, the Decoder receives the denoised latent space Z as input and it learns how to estimate the component-wise variance used to encode the image into a smaller latent space. After estimating the variance, the Decoder can generate a new image with the same dimension of the original one.

Inpainting Variant of Stable Diffusion
Inpainting is the task of filling masked regions of an image with new content either because we want to uncorrupt the image or because we want to replace some undesired content.
Stable Diffusion can be trained to generate new images based on an image, a text prompt and a mask. This type of model is already available in HuggingFace 🤗 and its called runwayml/stable-diffusion-inpainting.
To train Stable Diffusion to perform inpainting, we need to go through the same steps mentioned in the section above but with a slightly change on the input data. In this case apart from having the original image and text, we also have a mask (another image). For that, the U-Net needs to be adapted to receive an additional input channel for the mask.
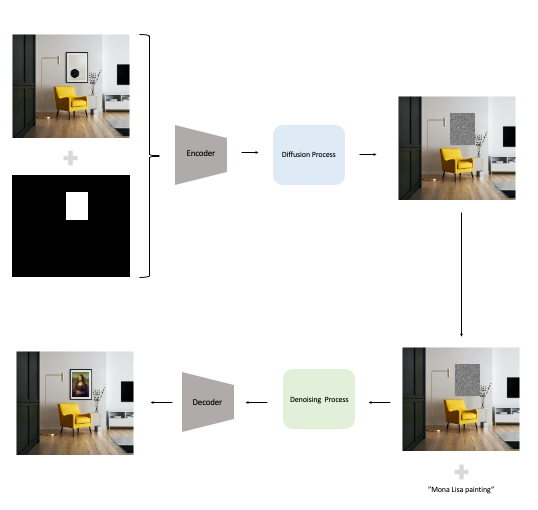
During training, the area that is not under the mask remains untouched and it is only encoded to the latent space, while the masked area goes through the all process of encoding, diffusion and denoising. This way, the Stable Diffusion model knows which area should remain the same and which area should change (Figure 8 illustrates this process).

In Figure 9, we have an example of what is needed to perform inpaitining on our own uses cases. We give the original image together with a mask of what we want to change and a text prompt with the change we want to see and Stable Diffusion generates a new image. In the next section, we will see how to do it in practice.

Interior Design using Stable Diffusion
In this section I will cover how to use Stable Diffusion in an inpainting scenario for interior design.
When it comes to buy a new house or apartment that is still under construction, usually we have access to 3D images of how it will look. Based on those images we can request to change colours or materials to make it tailored to our taste.
However, it is not easy to imagine if the changes that we are requesting will fit the rest of the house or not, and asking for a new 3D might be expensive and time consuming. Therefore, we can use stable diffusion to quickly iterate and get a sense of how things will look if we apply the changes we want.
For that we can use Python and HuggingFace 🤗 to build our own Stable Diffusion Interior Designer!
We start by importing the libraries:
import PIL
import torch
import ipyplot
from diffusers import StableDiffusionInpaintPipeline
Then we load the Stable Diffusion Inpainting model available in HuggingFace 🤗:
# load model
pipe = StableDiffusionInpaintPipeline.from_pretrained("runwayml/stable-diffusion-inpainting", torch_dtype=torch.float16).to("cuda")
With the model loaded, we load the original image and the mask of what we want to change:
- The white part of the mask is what will change while the black part is what will remain untouched.
- The mask was manually created, but we can also use a segmentation model to create it.
init_image = PIL.Image.open("<YOUR IMAGE>.jpg")
mask_image = PIL.Image.open("<YOUR MASK>.png")
ipyplot.plot_images([init_image, mask_image], labels=[“original”, “mask”], max_images=30, img_width=500)

With both image and mask loaded, it is time to create the prompt to condition the image generation to what we want and generate new images.
- In this case, I want to replace the black island and the black wall to a marble island and a marble wall.
# define prompt
prompt = "white calacatta marble island kitchen and white calacatta marble wall"
guidance_scale = 15 # weight of the prompt
generator = torch.Generator(device="cuda").manual_seed(0) # change the seed to get different results
# generate 10 images
images = pipe(prompt=prompt, image=init_image, mask_image=mask_image, num_images_per_prompt=10, guidance_scale=guidance_scale, generator=generator).images
# show results
print(prompt)
ipyplot.plot_images([init_image] + images, labels=[“original”] + [“generated”] * len(images), max_images=30, img_width=500)

The result looks good, but I also want to replace the wooden kitchen cabinets with white ones, so let’s redo the process:
- Load the last image generated and a new mask:
# load new image and mask
init_image = PIL.Image.open("IMG2.jpg") mask_image = PIL.Image.open("mask3.png")
ipyplot.plot_images([init_image, mask_image], labels=["original", "mask"], max_images=30, img_width=500)
2. Create a new prompt and generate new images:
# define prompt
prompt = "white kitchen cabinet"
guidance_scale = 15 # weight of the prompt
generator = torch.Generator(device="cuda").manual_seed(0) # change the seed to get different results
# generate 10 images
images = pipe(prompt=prompt, image=init_image, mask_image=mask_image, num_images_per_prompt=10, guidance_scale=guidance_scale, generator=generator).images
# show results
print(prompt)
ipyplot.plot_images([init_image] + images, labels=[“original”] + [“generated”] * len(images), max_images=30, img_width=500)

The result looks really good and I would like you to notice the details that Stable Diffusion is able to reproduced such as the kitchen tap or the reflection of lights in the cabinets. Although the reflection on the left is not aligned is incredible how it managed to take the lights into consideration.
Conclusion
AI is not only useful for organisations with large amounts of data, it can be applied to anything we can think of!
In this article, we explored Stable Diffusion for a non-traditional use case but for a traditional job that exists for decades. With a few lines of code we managed to generate as many different images as we wanted for each prompt which gives us a lot of possibilities to choose from.
However, like everything else, Stable Diffusion and, in particular the model we used, has its own limitations such as not achieving perfect photorealism as we saw in the light reflection or in Figure 14 where one of the chairs is inside of the kitchen island.
Nevertheless, the future of AI looks bright and some of this limitations can be overcome with a fine-tune in our own data and for our own use cases.

References
[1] Robin Rombach, Andreas Blattmann, Dominik Lorenz, Patrick Esser, Björn Ommer. High-Resolution Image Synthesis with Latent Diffusion Models. arXiv:2001.08210, 2022
[2] Diederik P. Kingma, Max Welling. An Introduction to Variational Autoencoders. arXiv:1906.02691, 2019
[3] Olaf Ronneberger, Philipp Fischer, Thomas Brox. U-Net: Convolutional Networks for Biomedical Image Segmentation. arXiv:1505.04597, 2015
[4] Alec Radford, Jong Wook Kim, Chris Hallacy, Aditya Ramesh, Gabriel Goh, Sandhini Agarwal, Girish Sastry, Amanda Askell, Pamela Mishkin, Jack Clark, Gretchen Krueger, Ilya Sutskever. Learning Transferable Visual Models From Natural Language Supervision. arXiv:1911.02116, 2021
More articles: https://zaai.ai/lab

